P-Cap, MoCap , and All That Jazz / Part 1
by Jim Tanenbaum, CAS
As sound people, we live in (according to the old Chinese curse) interesting times. Our technology is advancing at an exponential rate … with a very large exponent. The analog Nagra ¼-inch reel-to-reel tape recorder was used on almost all of the world’s movies for more than thirty years. Then DAT (Digital Audio Tape) cassette recorders (though more than one brand) held sway for another ten. Hard-drive recorders (I beta-tested a Deva I) led the race for five years, then DVD optical-disc recorders (albeit still with an internal HDD) for only three. Sony’s magnetic minidisk unit never made significant inroads in production recording. Now we’re using flash-memory cards, and I’m surprised they’ve held on for more than a year, but the original choice of CF cards seems to be giving way to SD ones (except for Zaxcom). Next year?
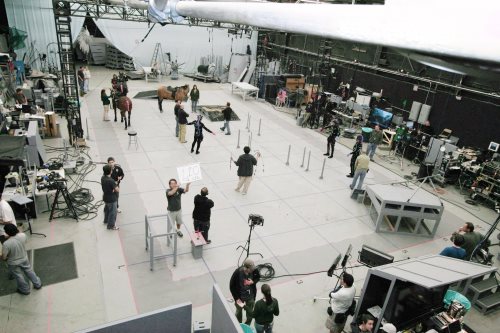
But it is not only the technology that is changing—so is the product. Made-for-Internet drama or documentary shows aren’t that much different from their predecessors, but reality shows certainly are a new breed: dozens of radio-mic’d people running around, in and out of multiple cameras’ view, and in and out of multiple Production Mixers’ receiver range. Fortunately, we have Zaxcom transmitters with onboard recorders. Still, things aren’t that different.
But “capture” shoots are. Almost entirely different from anything that has gone before. And capture for Computer-Generated Image (CGI) characters (sometimes called “virtual characters”) is different than capture for live-action shoots. Also, Motion Capture (MoCap) is different from Motion Control (MoCon), though these two techniques are sometimes used together, along with Motion Tracking (MoTrac). And then there is Performance-Capture (P-Cap). They will be described in this order: CGI MoCap, P-Cap, live-action MoCap, MoCon, and MoTrac. Following that, working conditions and esthetics for all types will be discussed.
So now, for those of you who have yet to work on a capture job, here is a primer (pronounced “prim-er”; not “pry-mer”). The rest will be on-the-job training.
CGI MoCap
For starters, the capture stage is called a “volume”—because it is—a three-dimensional volume where the position and movement of the actors (often called “performers”) and their props are tracked and recorded as so many bits. Many, many bits—often terabytes of bits. You can expect to record many gigabytes of audio per day.
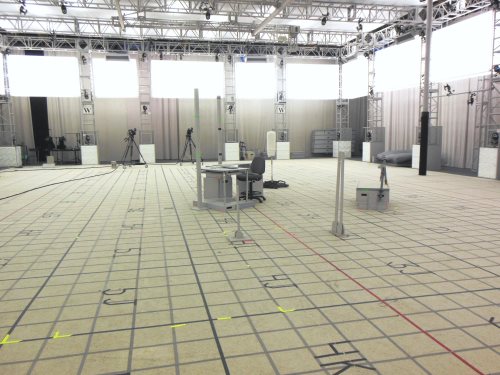
The stage containing the volume has an array of video cameras, often a hundred or more, lining the walls and ceiling, every one interconnected with a massive computer. Each camera has a light source next to, or surrounding, its lens, which special reflective markers on the actors will reflect back to that particular camera only. This is known as a “passive” system, because the markers do not emit any light of their own. The camera lights may be regular incandescents or LEDs, with white, red, or infrared output. More about that later.
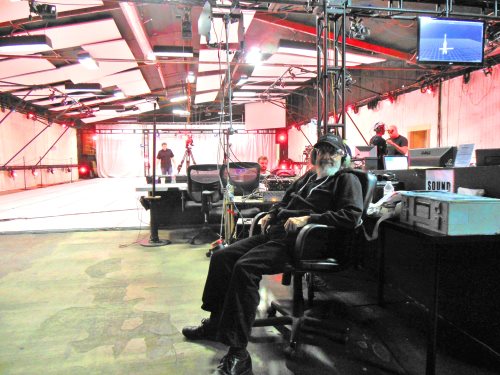
The cameras are mounted either directly on the walls and ceiling, or on a latticework of metal columns and trusses. WARNING: It is vitally important not to touch these cameras or their supporting structure. If you do, you must immediately notify the capture techs so that they can check to see if the volume needs to be recalibrated.
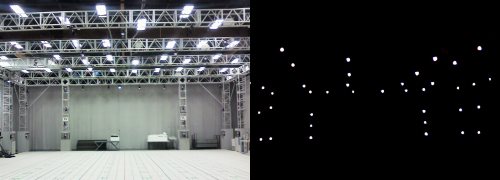
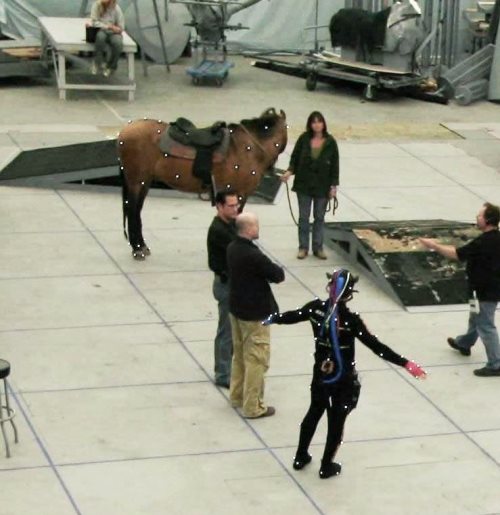
The actors/performers wear black stretch leotards studded with reflective dots. The material is retro-reflective, which means it reflects almost all the light back in the direction it came from, in most cases utilizing tiny glass spheres. Scotchlite™ is a typical example, used on license plates, street pavement stripes, and clothing. For use with the capture suits, the reflective material is in the form of pea-sized spheres, mounted on short stalks to increase their visibility from a wider angle. The other end of the stalk terminates in a small disc of Velcro™ hooks, so it can be attached anywhere on the capture suit’s fabric.
As an aid in editing, the capture suit usually has a label indicating the character’s name. Hands and/or feet may be color-coded to distinguish left from right.
The markers in the image above are glowing because a flash was used when the picture was taken. The camera was very far away, and the stage lighting completely washed out the light from the strobe on the people and objects, but the markers reflected most of the flash back to the camera lens.
Capture cameras mounted on more rigid
columns, but still subject to displacement if hit. [Formerly Giant Studios, now Digital Domain’s Playa Vista, California, stages]
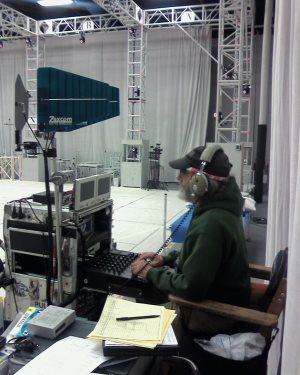 If MoCap is to be used on the actors’ faces, smaller, BB-sized reflective spheres are glued directly to the skin, sometimes in the hundreds. When too many have fallen off, work stops until they can be replaced, a process that takes some time because they must be precisely positioned.
Props and certain parts of any sets or set dressing (particularly those that move, like doors), also get reflective markers. Unlike “real” movies, props and set dressing do not have to look like their CGI counterparts, only have certain dimensions matching. They are often thrown together from apple boxes, grip stands, and “found” objects, and may be noisy.
Here is a description of the mechanics of MoCap.
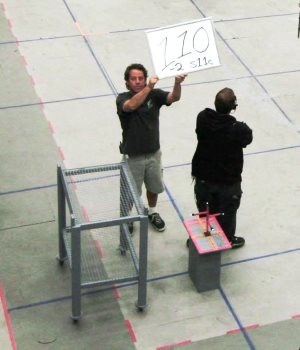
The floor of the volume is marked off in a grid pattern, with each cell about five feet square. This array serves two purposes: 1, it allows the “virtual world” in the computer to be precisely aligned with the real world; and 2, it allows for the accurate positioning of actors, props, sets, and floor contour modules.
The capture process is not like conventional imaging—there are no camera angles or frame sizes. The position and motion of every “markered” element is simultaneously recorded in three-dimensional space. Once the Director is satisfied with the actors’ performances in a scene, the capturing of the scene is finished. Later on, the Director can render the scene from any, and as many, POVs and “focal lengths” as he or she wishes.
But for this to be possible, every actor must be visible to (most of) the capture cameras at all times. This means that there must not be any large opaque surfaces or objects to block the cameras’ view. If there need to be physical items in the volume for the actors to interact with, they must be “transparent.” But glass or plastic sheets can’t be used, because refraction will distort the positions of markers behind them as seen by the cameras. Instead, surfaces are usually made out of wire mesh or screening, e.g., a house will have thin metal tubing outlining the doors and windows (to properly position the actors), with wire mesh walls (so the actors don’t accidently walk through them). In the virtual world, seen from a POV at some distance from the house, the walls will be solid and opaque, but as the POV is moved closer, at some point it will pass through the “wall” and now everything in the room is visible. Tree trunks can be cylinders of chicken-wire fencing, with strands of hanging moss simulated by dangling strings.
Props need only to be the same size and overall shape, and weight, to keep the actions of the actors handling them correct. They will have a number of reflected markers distributed over their surface. Live animals, if not the actual living version, are made as life-size dolls with articulated limbs and appropriate markers, and puppeted by human operators. This gives the actor something “living” to interact with.
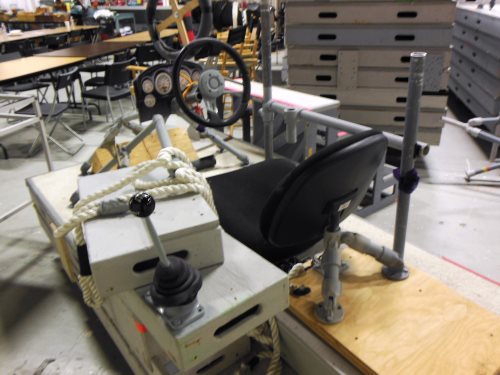
Since the motions and positions are captured in three dimensions, if the ground or floor in the virtual world is not flat and/or level like the volume’s stage floor, the bottom of the volume must be contoured to match it. This is done by positioning platform modules on the grid squares to adjust the surface accordingly. (More about this later.)
It is necessary to precisely align the real world of the capture volume with the CGI virtual world in the computer; otherwise, parts of the CGI character’s bodies may become imbedded in “solid” surfaces. The first step in this process involves a “gnomon” (pointer) that exists in both the real and virtual worlds.
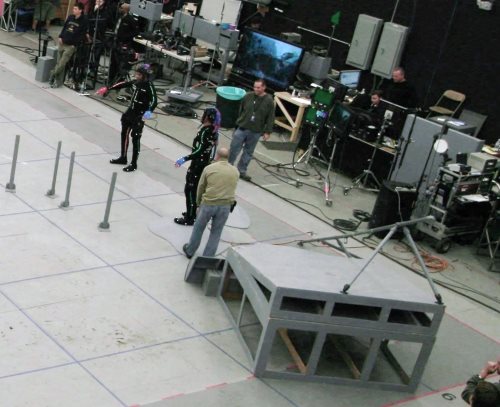
As an aid in editing, the capture suit usually has a label indicating the character’s name. Hands and/or feet may be color-coded to distinguish left from right. The gnomon has three arms at right angles to each other, tipped with reflective markers to allow the MoCap system to create its CGI doppelganger in the virtual world. To align the real table with its “twin” in the virtual world, the gnomon is placed at one of the real table’s corners, and then the table is moved in the volume until the virtual gnomon is exactly positioned on the corresponding corner of the CGI table. This is usually the simplest method. Another possibility is to go into the virtual world and mouse-drag the CGI table until it lines up with the virtual gnomon. The entire virtual world could also be dragged to position the table, but this might throw other objects out of alignment. Global position shifts like that are limited to adjusting the virtual ground with the volume floor after the contour modules are in place.
Real-world alignment gnomon and “transparent” table with wire-mesh surfaces. (Photo: ‘AVATAR’ ©2009 Twentieth Century Fox. All rights reserved)
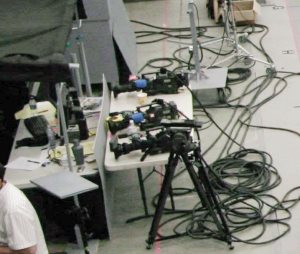
 Multiple conventional HD video cameras are used in the volume for “reference.” These cameras cover the scene in wide shots and close-ups on each character. This allows the Director to judge an actor’s performance before the data is rendered into the animated character. A secondary function is to sort out body parts when the MoCap system gets confused and an arm sprouts out of a CGI character’s head. Looking at the reference shot, the Editor can figure out to whom it belongs, and mouse-drag it back into its proper place. In most stages, the cameras are hard-wired into the system so they have house-sync TC and do not normally require TC slating. They may use DV cassettes and/or send the video directly into the system.
Until a few years ago, it was not possible to see the CGI characters in real time, but now Autodesk Motion Builder™ software allows real-time rendering, albeit in limited resolution. Warning: The flatpanel monitors on the stage have cooling fans that may need to be muffled or baffled. Video projectors’ fans are even louder.
Lighting in the volume is very uniform, soft and non-source, to ensure that the reference cameras always have a well-illuminated image. In addition, having no point-source lights ensures that there will be few, if any, specular (spot-like) reflections that might confuse the MoCap system’s cameras.
To capture motion effectively, the system must measure the marker positions at least twice as fast as the temporal resolution required. For 24-frame applications, this means a minimum 48 Hz rate. Currently, much higher rates are used, 120 Hz to 240 Hz. If “motion blur” is desired, it can be created in Post.
P-Cap
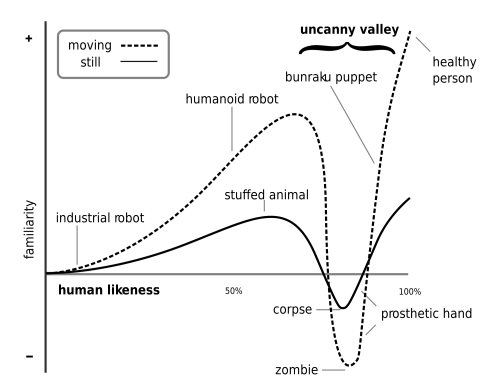
Motion Capture was developed first, and initially captured only the gross motions of the actor’s body. The facial features were animated later, by human operators who used mouse clicks and drags. Then, smaller, BB-sized reflective balls were glued to the faces, in an attempt to capture some of the expressions there. Unfortunately, this process couldn’t capture the movement of the eyes, or the tongue, or any skin wrinkles that formed. And since the “life” of a character is in the face, these early CGI creations failed the “Uncanny Valley” test.
It turns out that human beings evolved a built-in warning system to detect people that weren’t quite “right.” Back in the “cave people” days, subtle clues in a person’s appearance or actions were an indication of a disease or mental impairment that could be dangerous to your continued good health or even your very existence.
Multiple hard-wired HD reference cameras (although these have DV cassettes as well). (Photo: ‘AVATAR’ ©2009 Twentieth Century Fox. All rights reserved)
 A graph of the “realism” of a character versus its acceptability starts at the lower left with obvious cartoon figures and slowly rises as the point moves to the right with increasing realism. But before the character’s image reaches a peak at the right edge, where photographic images of actual human beings fall, it turns sharply downward into the valley, and only climbs out as the character becomes “photo-realistic.” Even an image of a real human corpse (possible disease transmission) is in the valley, as would be that of a super-realistic zombie.
When you watch a Mickey Mouse cartoon, you know the character isn’t “real,” so its completely “inhuman” appearance is not a problem. Likewise, when you watch a live-action movie, the characters are real, so again there are no warning bells going off in your brain.
Current computer-animated cartoons like Despicable Me or Mars Needs Moms don’t have a problem because their “human” characters are so obviously caricatures. The trouble began when CGI characters developed to the point of being “almost” human, and started the descent into the uncanny valley. The 2001 video-game-based movie Final Fantasy: The Spirits Within was the first attempt at a “photo-realistic” CGI feature movie using MoCap. Although an amazing piece of work for its time, it didn’t succeed visually or at the box office. But it didn’t quite fall over the precipice into the uncanny valley, either. The characters’ faces all had that “stretchy rubber” look when they moved, the motion of their eyes and mouths weren’t close enough to human, and most of their exposed body parts (except for hair, which was quite good) were rigid and doll-like, moving only at the joints. It still was “only” video game animation, and back then, nobody expected that to be real.
The stylized 2004 feature The Polar Express had an intentionally non-realistic, stylized look to its settings and characters, but since the MoCap process was used, their now, much more realistic motions caused a slight uneasiness among some viewers.
It wasn’t until Beowulf (2007), that the CGI capabilities increased to the “almost photo-realistic” level and a larger portion of the audience was disturbed by their being in the uncanny valley, albeit subliminally. It was mainly that the characters’ eyes were mostly “dead,” moving only on cue to look at another character, and never exhibiting the minor random movements that real, living eyes make continuously. The interior details of their mouths were also deficient.
Interestingly, the same capture volume that was used for The Polar Express and Beowulf was also used for Avatar (2009), but only after James Cameron spent a great deal of time and money to upgrade the system. Avatar successfully crossed the uncanny valley because the facial-capture cameras worn by the actors allowed for the recording and reproducing of accurate eye and mouth movements, and the formation and elimination of skin wrinkles. “Edge-detection” software made this possible. Thus was born the “Performance Capture” version of MoCap.
P-Cap volumes have the same soft, non-directional lighting as MoCap, plus additional lights mounted next to the facial capture cameras to make sure the face is never shadowed. Avatar used a single CCD-chip mounted on a strut directly in front of the performer’s face, and many systems still use this configuration. To avoid having the distraction of an object continuously in the actor’s line of sight, by the time AChristmas Carol went into production in 2009, four cameras were used, mounted at the sides of the face, and their images were rectified and stitched together in the computer.
At the beginning of the production of Avatar, Cameron used a live microwave feed from the face camera to “paint” the actor’s human eyes and mouth onto the CGI Na’vi’s face as an aid to judging performance. But after a while, this proved not to be that useful and was discontinued.
Face-Only P-Cap
For certain action scenes, the actors cannot safely wear a camera head rig. For these situations, only the body markers are used, and conventional MoCap is employed. Sound is recorded with a boom mike or wireless mike with a body-mounted lavalier, but will (normally) serve only as cue-track. Afterward, P-Cap techniques will be used to capture the face and dialog. If the director does not automatically ask for it, I recommend that you suggest he or she have the actors attempt to reproduce their body motions from the MoCap sessions as accurately as possible, because this will induce a form of realistic stress to their voices. These setups should be mic’d in the same manner as the rest of the project.
Alternate Techniques for Face-Only P-Cap
The capture infrastructure is continuously evolving, and several new technologies are emerging. Unfortunately, because of NDAs (Non-Disclosure Agreements), I cannot describe the projects I worked on in any detail. The information here comes from public sources such as Cinefex magazine and Wikipedia.org.
Real-time LIDAR (LIght Detection And Ranging) scanning is used to measure the shape and position of the performer’s head, down to sub-millimeter resolution. (This technique is also used to capture GCI data from large motionless objects like buildings, statues, vehicles, etc.)
Real-time multiple-camera, multiple-angle views are used to compute 3-D data from the different 2-D images of the performer’s face.
For both of these, you must usually keep the mike, the boom, and their shadows out of the working volume.
Live-Action MoCap
Live-action scenes, often shot against green- or blue-screen backings, need to have dramatic, sourced lighting. There are also many shiny wardrobe items and props, some of which even emit light themselves, and all these would confuse the passive MoCap system. Exterior scenes shot in direct sunlight can completely wash out the reflected capture-camera lights. For all these reasons, the reflective marker passive system cannot be used. Instead, “active” markers are used. These are larger, ½- to 1-inch cubes, with an LED array on each visible side. The markers emit a pattern of light pulses, either red or infrared, to uniquely identify each individual marker. Externally mounted markers that are visible in a shot can be eliminated with “wire-removal” software in Post. Infrared markers may sometimes be concealed under clothing to avoid this extra step, along with its attendant time and cost.
MoCon
Motion Control was developed long before any capture processes. A camera was mounted on a movable multi-axis platform that ran on tracks, and had sensors to record its motion, position, and lens settings. The initial shot was made by a human operator, then the subsequent ones could be made by playing back the recorded data and using it to control servo motors that moved the camera in a duplicate of whatever dolly, pan, tilt, zoom, focus, etc., moves were made the first time. This allowed “in-camera” compositing of multiple scene elements without the need for optical film work in Post, with the attendant problems of generation loss, color shifts, etc. A typical use would be to shoot a night scene of model buildings with illuminated windows using a large outdoor model city street. To get uniform illumination, the tracking shot past the buildings is shot in daylight, with the camera stopped down to reduce the exposure. This would require impossibly intense (and hot) lights to illuminate the windows brightly enough to read in direct sunlight. Instead, a second, matching, pass is made at night with the lens opened up, so that low-wattage bulbs will provide the proper exposure. The original Star Wars movies used this method extensively. While this system is still in use, it is now possible to use markers to track camera position, particularly with handheld cameras.
MoTrac
Motion Control requires a large amount of expensive equipment, but now that computers have become so much more powerful, digital manipulation can accomplish some, but not all, of the tasks formally done with MoCon. And of course, many that were impossible with MoCon. And sometimes MoTrac can be used instead of needing MoCap to record camera positions and moves.
MoTrac has two main applications. First, green- and blue-screen work where there will be camera moves that must be coordinated with an added background plate. To do this, an ordinary non-MoCon camera is used, and visible “fiduciary” marks are made on the screen as a reference for how the plate image must be shifted to have the proper parallax for the moving camera. Usually, the mark is simply an “X” made with pieces of contrasting color tape. Enough marks are placed on the screen to ensure that some of them will always be in frame. The computer tracks the motion of these Xs and then adjusts the position of the background plate to match.
Second, smaller marks, often ¼-inch red dots, are stuck on real objects that will have CGI extensions added on to them. The moving ampsuits used in Avatar existed in the real word only as torsos on MoCon bases. The CGI arms, legs, and clear chestpiece were attached later in the virtual world. If you are planting/hiding microphones, be careful not to tape over or otherwise occlude any of these marks.
While not commonly used at present, it is possible to put fiduciary marks on a mike boom as an aid in removing it Post. And the recent Les Miserables used them to help remove the exposed lavaliers that were mounted outside the wardrobe.
MoTrac MoCap
This hybrid has limited capabilities, but is often used for liveaction shoots on real locations or sets, with CGI characters that are human-shaped and slightly larger than the human performers. No reflective or active markers are used because the scenes often involve action and stunts, and the markers could injure the wearer or be damaged or torn off. Typical examples are the Iron Man suits and the humanoid droids in Elysium.
This method does not capture 3-D position information directly, and is used to simply “overlay” the CGI image on top of the capture performer’s on a frame-by-frame basis. Perspective distortion of the shape and size of the marker squares can be analyzed by the software to properly rotate and light the virtual character.
The actors wear grey capture suits with cloth “marker bands,” consisting of strips ranging from ½ to 2 inches in width having alternating white-and-black squares with a small circle of the opposite color in the center. The bands are fastened around the portions of the actor’s body that are to be captured: head, torso, arms, and/or legs. Only gross body movements are captured with this system; not details such as fingers or facial features.
If wireless mikes are used, there is no face-cam mounting strut available to mount the microphone, but neither it nor the transmitter has to be hidden. Like a regular shot, boom shadows have to be kept off anything visible in frame, except for the capture suit. (The shadow will not be dark enough to be mistaken for black makings.)
Editor’s note: Jim Tanenbaum’s explanation of P-Cap and MoCap practices will continue in the next issue of the Quarterly with specific guidance for sound technicians working these projects.
Text and pictures (except Avatar set pictures) © 2014 by James Tanenbaum, all rights reserved.